So, I've had some more time to play with the latest build of Firefox, and I liked it so much that I couldn't use the 1.5 version anymore. And this left me with a problem: hardly any of my extensions were compatible with the latest and greatest Firefox version.
I've made a bit of a research out of it, and here we are: I present you with the 3 ways to make extensions compatible with Firefox 2.0.
First though, I'd like to give you a few warnings:
- not 100% of your extensions will work,some of the older ones would really be incompatible. But if you had Firefox 1.5, than I doubt you'll have any problems.
- if you update any of the "made compatible" extensions using the automatic update function of Firefox, you may easily end up with an incompatible version again. This means you'll probably have to make it compatible once more.
That said, I hope you will find useful at least one of the following ways to make old extensions Firefox 2.0 compatible. I've also given you the main advantage and disadvantage of using each of the methods.
1) Making Extensions Compatible - THE EASY WAY
All you have to do is to go and download a wonderful Nightly Tester Tools extension. Not only it is compatible with your newest Firefox version, but it will also add a button to your Extensions manager (Tools->Add-ons):
Just click this button and restart your browser. Please note that this is a screenshot taken AFTER making all the xtensions compatible - so as you can see they're all active already.
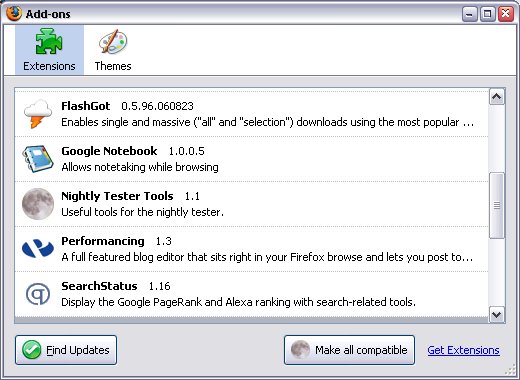
The advantage of this way is that it's really easy to make all your extensions compatible with any Firefox until Firefox 3.0 (that's what this extension puts as the MaxVersion for each of the extensions it fixes)
The disadvantage is that there is no equally easy way to revert the changes, so once "made compatible", your extensions will stay this way - there is no button to make them uncompatible again. However, disabling the extension seems to restore the versions.
2) Making Extensions Compatible - THE FIREFOX GURU WAY
What you can do is open the configuration (about:config) in your Firefox browser, right click the list and create a boolean extensions.checkCompatibility option there. Set its value to false and restart the browser.
Most of your extensions should work now. If you go to the Add-ons dialog, it will look like this:
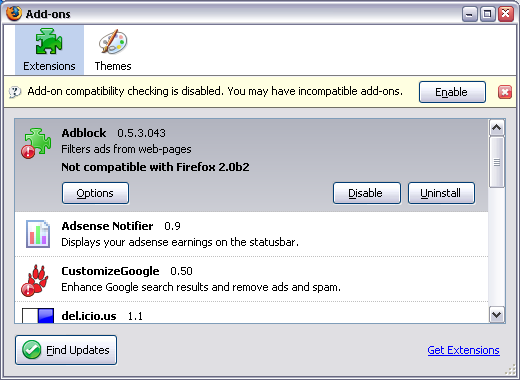
As you can see, extensions which would otherwise be incompatible, are flagged with the exclamation mark. You can also see a warning message which suggest you enable the compatibility check again.
The advantage of this approach is that it's really simple to make the change which affects all the extensions.
The disadvantage is that this way can be used as a temporary solution only, as it may lead to unpredictable consequences (some really old or really new extensions may malfunction).
3) Making Extensions Compatible - THE HARD WAY
This is essentially a manual way of accomplishing the result of using the Nightly Tester Tools extension.
The advantage of this way is in total control over which extensions you'll hack to become compatible.
The disadvantage is in the fact that every step of this method is rather hard: distinguishing extensions to make sure you're changing the one you really want, and
manually changing the versions supported.
- Close your browser
- Go to the folder with all your Firefox extensions:
C:\Documents and Settings\USER\Application Data\Mozilla\Firefox\Profiles\PROFILE\extensionsIn this line, USER is to be replaced with your Windows login, and PROFILE will be the name of your Firefox profile (weird looking folder name, usually the only one found in Profiles folder)
- You'll see a list of folders there, 1 folder for each extension. The names of the folders are the unique identifiers for extensions, so they may seem scary at first:
{34274bf4-1d97-a289-e984-17e546307e4f} - this is the Adblock extension GUID. - Go to any folder, and open the install.rdf file for editing with your favorite clear text editor. Notepad works, but using it will make things even harder cause it doesn't part rdf files properly. Your choice
 Now back to the business. You need to look for 2 things:
 - name of the extension, to make sure you're editing the right one
Just look for the em:name, and try to recognize the extension from the description that follows:
- a block of minimal and maximum Firefox versions the extension will work on.
Warning: there could be few similar blocks with versions, so make sure you'll edit the one which has EXACTLY this em:id, the one which belongs to Firefox browser: ec8030f7-c20a-464f-9b0e-13a3a9e97384.
- name of the extension, to make sure you're editing the right one
- Edit the maxVersion parameter (shown in bold to make it easier), and change it from 1.5 to 2.0b2.
- Remove the extensions.cache file from the C:\Documents and Settings\USER\Application Data\Mozilla\Firefox\Profiles\PROFILE\ folder - this will make sure Firefox will read all the changes from install.rdf files and pick up the now "compatible" extension
- Restart your browser, enable the previously disabled extension you've just edited
- Restart your browser again to activate this extension
There you have it. Enjoy!
